Overview
Google offers a service that allows you to view your DreamHost email within Gmail. It's called 'Mail Fetcher' and you can use it to import email to Google. You can use this service instead of forwarding your email to Gmail.
This article explains how to set up Mail Fetcher at Google. For further information, see the following Google support page:
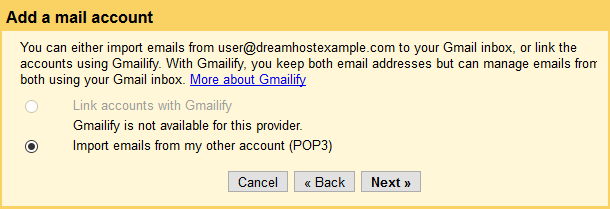
The following instructions only allow you to IMPORT existing email from your DreamHost account. Gmail no longer allows you the ability to sync a DreamHost email address to a Gmail address to retrieve future emails. This requires 'Gmailify', which is currently unavailable at DreamHost.
Additionally, only emails in your Inbox will be fetched from Google (since you're using a POP connection).
Checking your RockNspace email in Gmail
- Create a fully hosted DreamHost email address. You must set first set up a DreamHost email account before you proceeding to the next steps.
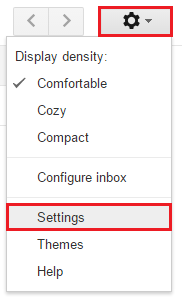
- Log into Gmail.
- On the top right, click the gear icon.
- From the dropdown, choose 'Settings'.
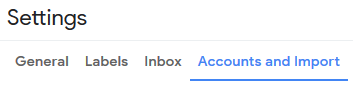
- Click the 'Accounts and Import' tab.
- Next to 'Check mail from other accounts:', click 'Add a mail account'.
- A pop-up box displays:
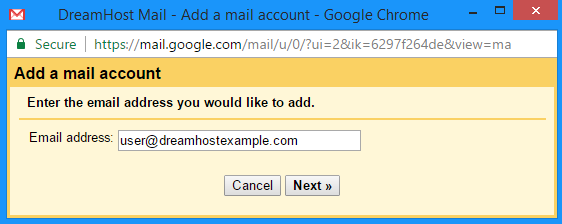
- Enter your FULL email address and then click the Next button.
- Click the Next button. As mentioned in the warning box above, you can only import email to Google since Gmailify is not available.
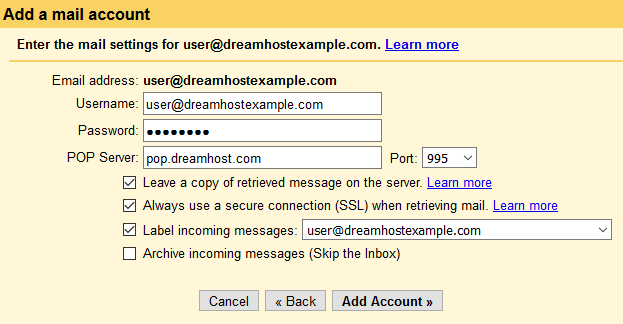
- Enter the following:
- Username — Your full DreamHost email address.
- Password — Your DreamHost email password.
- POP Server — This should only be 'pop.dreamhost.com'.
- Port — 995 (for secure POP3 mail). Note: You must use POP. Using port 993 for IMAP will not connect.
- Leave a copy of retrieved message on the server — Check this option.
- Always use a secure connection (SSL) when retrieving mail — Check this option.
- Label incoming messages — Check the box if you’d like to easily see which emails in your inbox came from this account.
- Archive incoming messages — Don’t check. Only check if you don’t want to see new messages from the other account in your inbox.
- When finished entering the settings, click the Add Account button.
- A confirmation appears notifying you that the address has been added. You can now continue to configure sending email as this user.

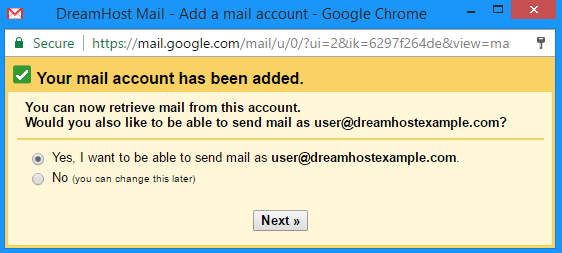
Continue to configure this address to also send email
- Select the 'Yes' radio button and then click the Next button.
- When prompted in the next box that appears, enter your name and select if you want to treat this email as an alias within Gmail. View the following article for information on how to make this choice:
- When finished, click the Next Step button.
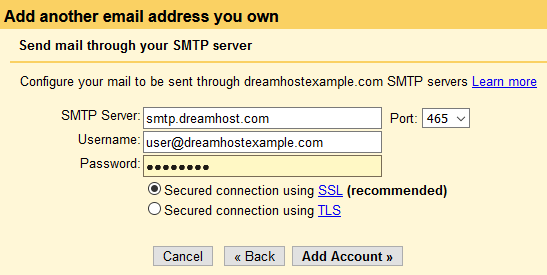
- Enter the following settings for the SMTP server to send email through:
- SMTP Server — This should only be 'smtp.dreamhost.com'.
- Port — 587
- Username — Your full email address
- Password — Your email password
- Secured connection using TLS — Check this box
- When finished, click the Add Account button to finalize the configuration.
- The final page notifies you that you a confirmation code was sent to the new address:
- Check your inbox and locate the code, which looks something like "215870196".
- Copy the code into the field, and then click the Verify button.
- The window disappears without a confirmation, but this completes the configuration.


You can now view and send your DreamHost email in your Gmail account.
Sending email that shows your DreamHost address
Now that you've configured your DreamHost email address in Gmail, you can send email within your Gmail account.
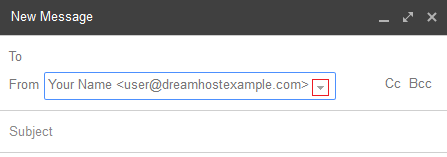
When creating a new message, click the down arrow icon for the FROM address and select your DreamHost email before sending:
When someone receives the email, it appears as if it was sent from your RockNspace/DreamHost email account.