Quick Manual Settings
Manually configure your mail client using the settings below:
|
RockN.host2- US - Houston (TX)
Secure SSL/TLS Settings (Recommended)
|
RockN.host2- US - Houston (TX)
Non-SSL Settings (NOT Recommended)
|
|||||||||||||||||||||
Note:The above SSL settings are for our RockN.Host1 (Special & most Starter Plans) servers. If you do not know which server you are on Contact Support.
|
RockN.host1- US - West (LA)
Secure SSL/TLS Settings (Recommended)
|
RockN.host1- US - West (LA)
Non-SSL Settings (NOT Recommended)
|
|||||||||||||||||||||
Note:The above SSL settings are for our RockNspace1 (Business & Corporate Plans) servers. If you do not know which server you are on Contact Support.
Step By Step Instructions
- Open the Apple Mail application by clicking Mail in the top menu bar.
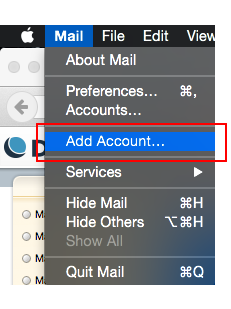
- Select the Add Account option.
The 'Choose a mail account to add...' page opens:

- Select the Add Other Mail Account… option and click the Continue button.
This example uses the email address "user@dreamhost.com":

- Enter the following:
- Full Name: This is how you'd like your name displayed when sending email.
- Email Address: This field must contain the full email address.
- Password: This is the password you set up for the email when creating it in your panel.
- Click the Create button when finished.
You should receive notification that the Account must be manually configured: - Click the Next button to proceed to manually configure your email address.
After you click Next to proceed, the Incoming Mail Server Info page opens:

- Enter the following settings on the Incoming Mail Server Info page:
- Account Type: Choose IMAP (You Want Multiple Devices Synchronized for Checking Mail) or POP (1 Device)
- Mail Server: mail.EXAMPLE.COM (replacing EXAMPLE.COM with your actual domain name or Enter your mail servername from your Account Hosting Email Sent to you on Account Setup.). In this example, mail.dreamhost.com is shown as the incoming Mail Server.
- User Name: Your full email address.
- Password: This is the password you set up for the email when creating it in your DreamHost panel.
- Click the Next button to proceed.
After you click Next, you should receive a warning about the mail server certificate:
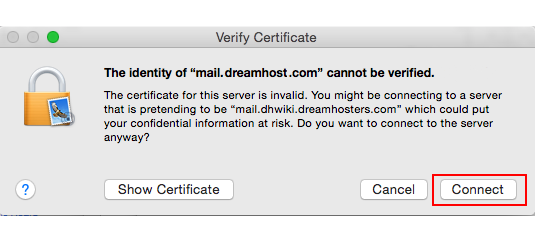
- Click the Connect button to accept the certificate.
After you connect, the Outgoing Mail Server Info page opens: - Enter the following settings on the Outgoing Mail Server Info page:
- SMTP Server: Use mail.EXAMPLE.COM (replacing EXAMPLE.COM with your actual domain name as you did previously). This example uses mail.dreamhost.com.
- User Name: Your full email address
- Password: This is the password you set up for the email when creating it in your DreamHost panel.
- Click the Create button to create the email address.
Your new email address is now set up and ready to use. You can send a test message to confirm it's working properly.